Thursday, January 26, 2012

ABS glue

As my makerbot print area is kind of small so most of my model need to split into a few parts to fit the print size of the machine, therefore I'll need some glue to stick those parts together.

I found some tutorial teaching people how to make their own ABS cement. And it looks very easy to make one.

I find that kind of hard to buy Acetone in Singapore, I found that many people asking around where to buy Acetone in Singapore. I can't fine the Acetone like what you see in the image below, but you can buy a 80ml one in pharmacy like Guardian, please note that not all Guardian sell Acetone, you got to try your luck and ask around.

I tried to ask at some paint shop, some of them don't sell Acetone, some got but not sure whether it's the pure Acetone. Maybe you can try and share the result.


you can visit the site below for details:
http://www.protoparadigm.com/2011/12/abs-glue-weld-cast-texture-and-more/


Below are what I copied from the blog for my own records.


Looking for an easy way to permanently fuse printed parts? Want to smooth, texture or paint printed walls? Need a way to cast ABS at room temperature? All this and more awaits you with this handy concoction.
Here’s a handy concoction to have on hand when working with ABS regardless of whether or not you use a 3d printer. We’re calling it ABS Glue (thingiverse ‘thing‘), and it’s pretty awesome. So far we’ve used it to…
  • Fuse printed beams and assemblies
  • Fix broken parts
  • Smooth & Texture ABS surfaces
  • Cold Cast ABS in printed PLA Molds
  • and More! (spoiler: Glow-in-the-Dark ABS Rocks)

MAKE IT!

Warning! : This mixture is a basic ABS Cement and as such all the same precautions should be taken as when using store-bought ABS Cement, especially providing adequate ventilation during use. At no time should anything be dumped down the sink. Acetone and skin aren’t friends, try not to let them spend much time together. If this mixture gets on your hands, there is the possibility of absorption through your skin from the defatting caused by the Acetone. This isn’t finger paint.
From which you make ABS Glue
Gather Materials:
  • Nail Enamel/Polish Container (or other solvent resistant container, preferably with a brush set in the cap)
  • Acetone
  • ABS Filament of choice
  • Something with which to clip above filament
  • Rags are handy for messes
Assemble:
1. Empty and Clean Nail Polish Container
Acetone is the active ingredient in nail polish so a good rinse at full concentration should do an effective job of cleaning it out. Once clean, fill container approximately half full and seal the cap. (Acetone is highly volatile and will quickly evaporate away if the cap is left off for too long)
2. Fill container approximately half full with Acetone and seal.
Acetone is highly volatile and will quickly evaporate away if the cap is left off very long
3. Snip filament into pieces
4. Drop into Acetone until container is about 3/4 full
5. Swirl and wait
If your impatient like me you’ll go back and check it EVERY 5 MINUTES to see if it’s done…it won’t be. Light concentrations can be ready to use in under an hour, heavy mixtures can take as long as day to be fully suspended.
6. The mixture should be ready when it is relatively free from lumps and of the desired consistency. Add more Acetone or filament to get needed thickness (if you filled it only 3/4 full there should still be room).
“Say, how thick do I want this stuff anyways?”
Basic welding needs less filament, casting and painting does well with more, smoothing and texturing is anywhere in-between depending on the degree to which you wish to modify the surface. If your bottle is left open too long the Acetone will quickly evaporate leaving a pudding-skin like texture; simply add more Acetone and mix.
I keep a bottle of each filament that I commonly use so I am able to match it to the job. Natural is always a handy one to have around as it contains no added pigments.
Black - Natural - Neon Green - Glow

Wait; Glow? Yes, this process works with Glow in the Dark ABS (Don’t have any? We have half pound coils in both 3mm and 1.75mm).

FUSE AND WELD

We originally started using this to create beams longer than the build envelopes of our printers. Fusing separate pieces together is as simple as brushing some of the glue along the interface and gently pushing them together. Depending on the type of joint and the amount of glue used it can take a few minutes to fully set. Once set, the joint is often the strongest part of a print. This beam of Plastic T-Slot is made from 4 pieces and has a total length of over 400mm.

There it is, a clean good looking seem. Fusing multi-part prints and repairing broken pieces is now quick, easy and looks good. I love it.
Speaking of fusing. If you’re having trouble with prints sticking to the build platform, painting a bit of this on the bed before hand can go a long way towards keeping that part flat on the print surface, just be careful when you try to pry it off.

SHINE AND TEXTURE 

A use that definitely has potential and one we have had reasonable success with is using the brush to smooth, shine or texture a surface. A smooth glossy surface is difficult and would take a bit of experimenting with different concentrations and brush textures. Sanding before helps though is not necessary. On the beam below you can see how different amounts of ABS Glue produce a different effect. The top right side produced a very smooth surface using less than the face below it but more than the quick brushes done on the left, it all comes down to experimenting.

Placing wax paper or Polyimide Tape covered aluminum over the surface until it sets is another option to try. Want a bumpy surface or porous look, try pressing heavy grit sandpaper onto the surface. Scales; a mesh screen. Similar methods are used with Sugru. Here. However unlike Sugru, which cures, you have the opportunity to repeat the process as many times as you like.

COLD CAST ABS

The suspended ABS mixture can also be poured into casts to create, well, anything…To show this we printed the ProtoParadigm Logo set .5mm into a block of PLA.
The PLA isn’t affected by the Acetone and will evaporate away leaving the ABS Behind. Multiple applications will completely fill the mold with ABS. To create a smoother surface, I found it helps to pour a little straight Acetone or a light mixture of Acetone and filament on the top. I don’t think this would work where large amounts of ABS need to be deposited but for small things it works quite well.

MORE!

Paint Glow-in-the-Dark ABS on a mirror or glass and send a friendly message to your house-mates.
A Shining Example
Lower your life expectancy by bonding a glowing thermoplastic to your nail. (Please don’t though)
A Probably-Bad-Idea Idea

If you make some of this stuff and find it helpful or come up with other cool uses. Tell us about it. Or better yet, take a picture and send it to us at pics@protoparadigm.com.
Update: It has correctly been observed that MEK (also available at hardware stores) can be used instead of Acetone. MEK will provide a longer working time which may or may not be beneficial for your application. It is in general a more active solvent, better at dissolving ABS, but also a bit more nasty a chemical.

Safety switch red light on - Solution


You can refer back to Safety switch red light on

I've search through internet and found nobody have the same problem as mine, and I write to Makerbot support they can't gave any solution to this issue either.

But I manage to get this problem solved, guess what did I do? I just do a few tabs in the thermostat and this magical tabs just solve the problem.


Don't ask me how come it work in this wat like some ritual or black magic act. At least now I'm using it like normal and whenever the issue come again I just do a few tabs on the termostat.

Thursday, January 5, 2012

Safety switch red light on

The safety switch tripped only when the thermal core is over heat. My problem is the red light was on ever since I first turn on the TOM.


When the first time I encounter this issue, I found a solution here saying that tighten the thermostat connection will help and it solve the problem, but I when I turn the TOM on at the following day, the red light on again, and I couldn't solve it by tighten the thermostat connection.

I'm still looking for solution at the moment, and found out some other possibility cause of this issue.
I made a copy of the info for my own record:


EC output voltage fail (and safety cut-off) in the middle of print when ABP temp above 100/105 -- Power Supply (Cooler Master) Problem?


I have a problem with my prints failing due to the safety board tripping in the middle of a print.   The temp of the ABP is not really that hight as I have monitored it closely during prints.  The issue only occurs when I have the ABP temperature above 100/105 (e.g. 110, 115, 120).  The red light comes on, but the machine keeps trying to print (but no longer extruding due to temperature of the extruder being too low)
Measuring the input voltage from the extruder input into the safety volt is less than a volt after the failure (which leads me to think it is the power supply and not the safety cut-off relay).   Further, if I switch the system off, I am unable to switch it back on for about 10 minutes (indicating the power-supply is in 'safety' mode or whatever).   I  In the middle of a build the safety board trips and seems to kill power to the extruder. 
I think that the power-supply is tripping and  causing the safety shutoff to trip (because the temperature is no longer at the built-temperature...too low or due to input voltage dropping).  
Does this happen for anyone else?  Does the Cooler Master 460W just suck?  Or do I have more serious things going on? (EC board failure of some kind).  
Any ideas on how to diagnose this?   I will check the input voltage to the EC and post results.  

Off printing cause by the loosen belt

Print 29 shows that the X axis idler belt must be loosen. As sometime screws can be loosen up due to the vibration during printing.


So I just tighten the belt, and come back on the following day to test but still it happened again, so I dissembled the cover and found out the both screws of the idler pulley drop out. Maybe I didn't tight the screw enough at the first place.


No choice I have to dissembled the Y-stage, took out the motor and assemble them back.
It solve the problem.

Friday, December 23, 2011

Challenge the sphere again

So far I haven't finished any sphere printing yet, therefore I tried to print again this time. 


Test print 19, fail agian. The side of the sphere warp and cause the nozzle ran into it.


Test print 20, the bottom of the sphere shrank, I'm not sure what's the problem. Could it because of the over hang problem? Temperature of the plastic no even? Size of the sphere too small? But at least I got a sphere looking object, although it looks more like a mushroom.


Test print 21, again the nozzle ran into it. Failed.


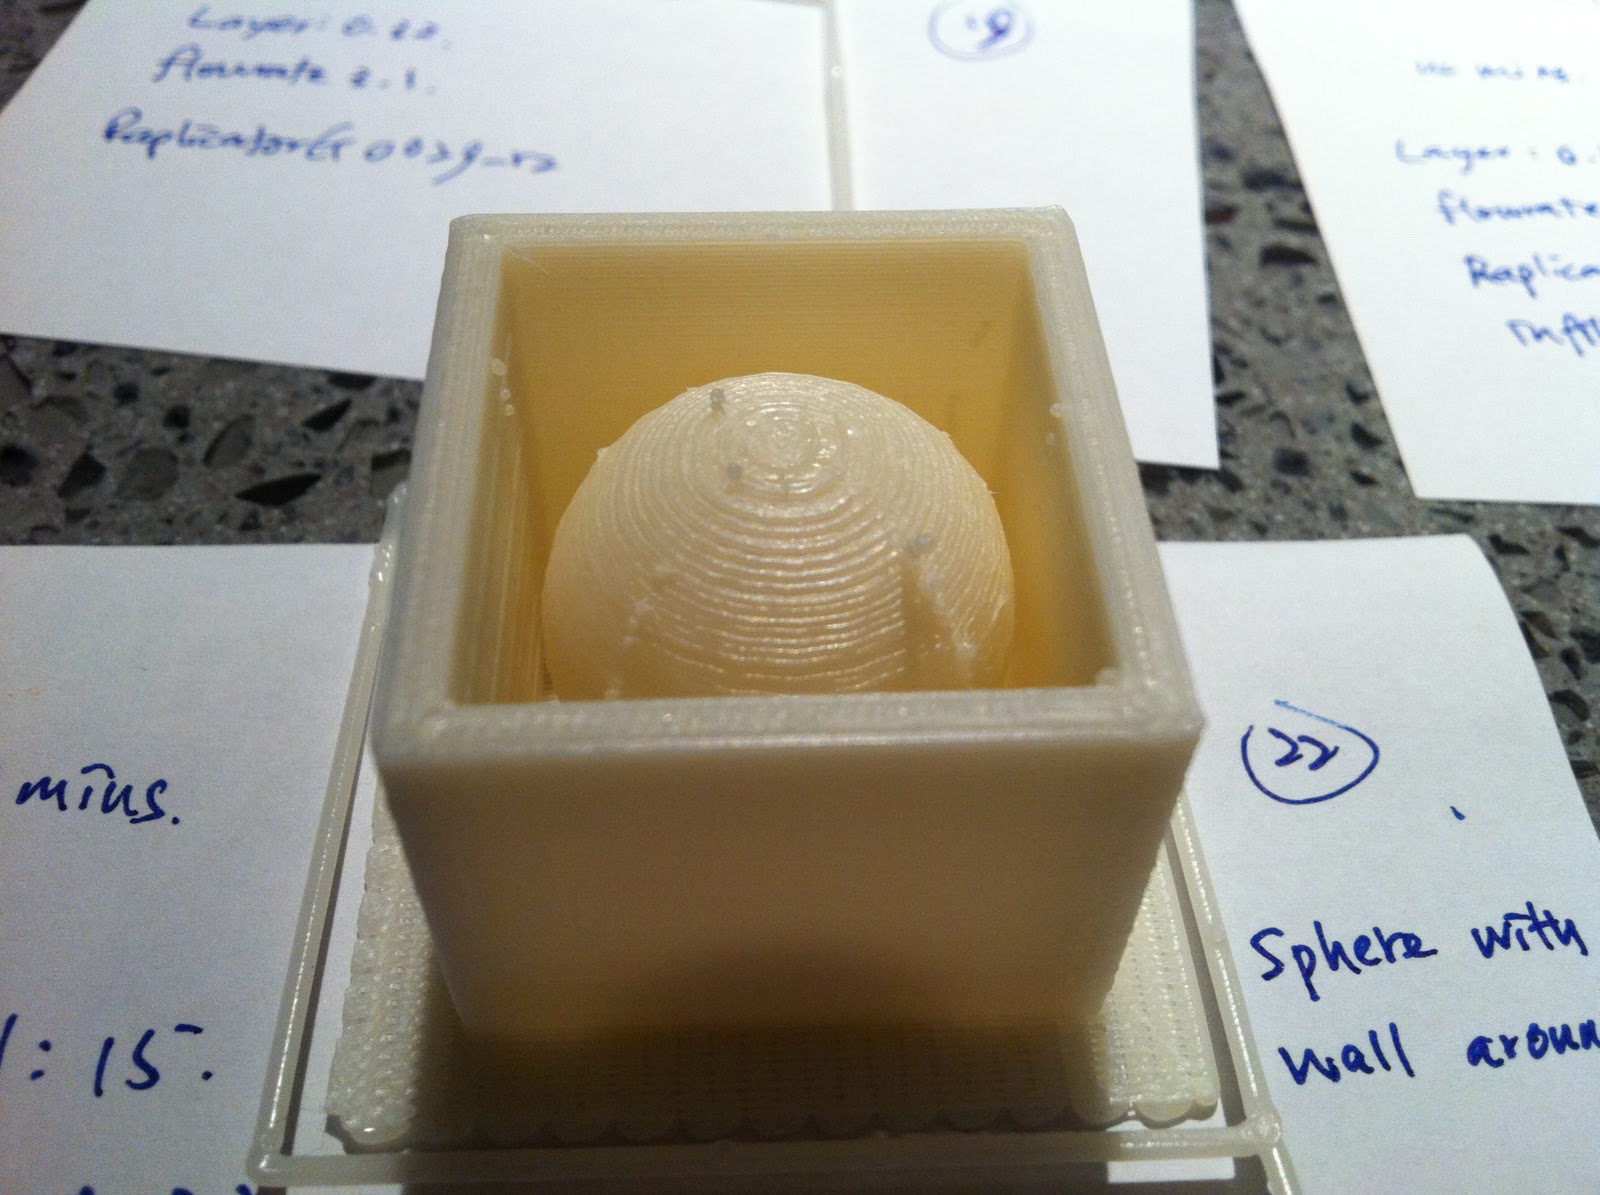
Test print 22, the size of the sphere is bigger than Test print 19, I give it a wall to keep the temperature the same I hope i works, and also drive away the nozzle by printing the wall instead of keep moving on top of the sphere, so that it have some time to cool down.


Compare of 2 spheres. I know it can't be compared as they are different size. Just for a record so far what I've tested.


Wednesday, December 21, 2011

Filament not feeding


Currently I'm still using the filament that came with the Makerbot TOM. It have no spool, so I just lied the entire row of filament beside the machine, it'll get hair wired once in a while and I need to untied them.

there was one time they really too hard to fix with no choice I just cut the filament and feed it again, and then there was where I face another problem, the filament was not feeding, it just stuck there and I can hear the clicked jamming sound from the driver pulley.

I found some possibility problem from Makerbot Wiki on When Things Go Wrong

I dissembled the stepstruder clean the driver pulley teeth in case some plastic clogged in between them.
Removed the crooked filament that block the entrence of the thermal barrier.
After making sure there wasn't anything clogged in the plastruder, then I put them back and test. It still jam.

I repeated a few times on the above action and I decided to try press and push the filament into it, and it actually can come out from the stepstruder but when I stop pushing it stop. I have to keep pushing and let it run for some time and then it solve the problem, but after this incidence it'll still jam a little bit whenever the beginning of new print.


Below are what I copied from the site:

Damaged Plastic Filament 

Rarely, the toothed drive pulley manages to etch an indentation into the plastic filament. As a consequence, there is nothing for the drive pulley to push against, and the filament doesn't advance.
One way to fix this condition is to apply some physical pressure, pushing the filament into the Plastruder. Eventually, the filament will advance past the damaged section, and the drive pulley will start grabbing the filament again.
Alternatively, you can put the Plastruder into reverse, and gently pull the filament back up and out of the plastruder. You should be able to physically inspect the filament to confirm the problem. Then, use a pair of scissors to snip off the damaged section of filament, and feed it back into the Plastruder.
This can also be a symptom of the idler wheel being too loose to adequately grip the filament. If the teeth of the pulley do not sufficiently indent the filament, the teeth created will have insufficient strength and be striped away, creating a 'flat spot' where it will be unable to advance. Try adjusting the idler wheel slightly tighter than the 2mm guide rod, or even as tight as possible as it will not adversely affect its operation.


Misadjusted Idler Wheel Tension

It's easy to get the tension in the Idler Wheel wrong. If the Idler Wheel is too loose, the drive pulley won't grab and push the filament. We had difficulty with our Idler Wheel tension because we tried to adjust the tension after fully assembling our Plastruder, with the Plastruder electronics in place. It turns out that it's hard to get a wrench in the right place if the Plastruder is fully assembled. Instead, it was useful to adjust the Idler Wheel tension with the Plastruder on a benchtop, with the electronics off to the side. Initially, our team was concerned that making the Idler Wheel too tight might be problematic. We found that we were able to fix the Idler Wheel at its closes position to the drive pulley, and everything worked great. The plastic filament was crushed between the pulley and idler wheel, but this turned out to be a good thing. The pulley applied good, constant pressure to the filament. One word to the wise: do be careful when tightening down the nuts holding the Idler Wheel in place: acrylic cracks easily under pressure. Using washers to properly fill the space along the Idler Wheel bearing is crucial to having a snug fit without breaking the acrylic.


Filament Slipping Off Idler Wheel


On one Plastruder, we observed the plastic filament slipping to the side of the Idler Wheel. The filament would then be pushed against the wall of the Plastruder, where it would jam. Some customers were able to adjust the position of the Idler Wheel by moving washers from one side of the wheel to the other. However, my team resolved this problem by taking two Idler Wheels and super-gluing them together, creating a two-panel-thick Idler Wheel. This Idler Wheel was easier to position and worked perfectly the first time. Note: we don't recommend using this technique on mk4 or later extruders! See a more detailed discussion of this technique here: DoubleIdlerWheelDiscussion


Filament not going through the nozzle

If you find that your filament is blocked somewhere inside the white thermal barrier, it may well be that it got blocked at the entrance of the heater barrel: the thermal barrier hole may be larger than the heater barrel hole, creating a thing edge around. First, make sure that you have heated the plastruder well (a good 2 minutes at working temperature) before inserting the filament. That should help soften it to negotiate the opening. Second, if you still are having problems, before inserting the filament take some sanding paper and sand the edge of the filament into a point. That should make the filament properly align itself in the hole.


Flossing the teeth 

If you get repeated jams that seem to go away if you push on the filament from the top or if you back the filament out and cut off the stripped piece and put it back in, then you probably have clogged driver pulley teeth. The only effective way to fix this is to take apart the plastruder and pick the plastic out. If you find yourself doing this frequently, it might be helpful to leave out the first screw on the motor (the inside one) so you can easily remove the motor by taking out the other three instead of disassembling the whole plastruder. If, however, pressing down on the filament only helps a little and it just gets more stuck and stops, then you probably have a clog in your nozzle (possibly caused by Burning Plastic).

Tuesday, December 20, 2011

Model warping problem


This photo shows the warping problem. I'm using ABP with the heated platform in default setting 110º c, interior temperature about 26º c and the air-con was blowing to the printer.


The warping is quite serious causing that corner height about 0.5 cm shorter.

The ABP is working after I update to the 3.1 firmware.

I found the solution at Makerbot blog, I clear the ABP surface to make sure no dust on top of it, download the ReplicatorG 0029_r2, the default setting infill is lesser it's different with ReplicatorG 0028, turn off the air-con. And I realized that the model now stick firmly to the platform and no warping at all.


http://www.makerbot.com/blog/tag/warping/ 


Copy from the blog for my own records:


As printed plastic parts cool the different areas of the object can cool at different rates. 1  Depending upon the parts being printed, this effect can lead to warping and curling.  Although PLA has a much lower shrinkage factor than ABS, both can warp and curl, potentially ruining a print.  There are some very common ways to deal with this potential problem, the most notable being a heated build platform.  However, sometimes that might not be enough.
  1. Use a heated build platform.  A heated build platform helps keep the lowest levels of a print warm as the higher layers are printed.  This allows the overall print to cool more evenly.  A heated build platform, sometimes abbreviated as HBP, helps tremendously with just about any ABS print and large PLA prints.
  2. Print with a raft.  Rafts are a printing option in ReplicatorG and Skeinforge.  They’re basically a large flat lattice work of printed material underneath the lower-most layer of your printed object.  They’ll also help reduce warping and curling by allowing your printed object to adhere better to your flat build surface.  Other variations on this are to print with a larger raft and/or a thicker raft comprised of more layers.
  3. Calibrate your starting Z height.  A good first layer makes all the difference.  If your starting Z axis height is too high, the extruded filament won’t be able to make a good bond with the platform.  If you think your Z axis starting height is too high, try lowering it by 0.05mm increments until you find a good first layer.
  4. Get the right build surface.  Some people have experimented with different surfaces such as steel, titanium, glass, different kinds of plastic, different kinds of tape, and foam board.  However, I find both ABS and PLA seem to stick really well to hot or warm Kapton tape.
  5. Clean your build surface.  ABS and PLA stick better to a clean build surface.  Keep it clean of dust, pieces of old prints, and any other debris.
  6. Print slower.  Printing slower allows finer detail, better adhesion to the build surface and lower layers, and gives the printed part more time to cool evenly.
  7. Print cooler.  Printing at a lower temperature isn’t always an option.  Ideally, you should be printing at the lowest temperature required for extrusion and that allows good interlayer adhesion.  However, trying lower temperatures isn’t for the faint of heart.  Printing at a too low a temperature could cause harm to your extruder motor or extruder.
  8. Eliminate drafts or enclose your robot.  Forrest Higgs found that having his 3D printer too close to an open window caused very uneven heating across his build surface.  This in turn caused the side of his prints closest to the window to curl.  Since keeping the window closed wasn’t an option for him, he compensated for the window drafts by adding a heat lamp.  Cupcake and Thing-O-Matic owners might have an easier time of eliminating drafts by simply enclosing two or three of the sides of their robots.  It will also have a fortunate side effect of helping to control fumes.
  9. Design with mouse ears.  Zach Smith’s solution was to add little discs to corners of an object to help those corners stick to the platform.  These essentially serve as “mini-rafts” to give those corners more surface area and better adhesion without having to print an entire raft.
  10. Design with aprons to hold down corners.  Forrest Higgs suggested adding “aprons” around an object to be printed, while that object was being printed on a raft.  These low thick pieces of plastic help keep the raft flat and help prevent any curling or warping from affecting the desired printed object itself.
  11. Design with surrounding thermal walls.  While Forrest Higgs’ apron approach provides a mechanical advantage of essentially holding down corners with a chunk of plastic, Nophead has added thin surrounding walls to his designs to act as baffles to keep warm air around the printed object as it moves around.  He’s postulated that a very thin surrounding wall could have the same beneficial effect as printing inside an enclosed build chamber.  Interestingly, it seems that Nophead suggests that designing objects with more rounded corners might also help avoid curling and warping at those corners.
  12. Reduce infill.  When printing a model you can chose to print it hollow, completely solid, or some percentage between zero and 100.  However, as Nophead points out even the plastic inside a model exerts a force on the entire printed object as it cools.  It stands to reason that the more plastic you have, the more those pieces of plastic will pull against themselves and the build surface as they cool.  By reducing infill there will a reduced amount of internal tension as the object cools.  Reducing these internal forces by printing with a lower infill ratio can help reduce curling and warping as well.
  13. EDIT:  Sand the Kapton.  Charles Pax has suggested that sanding a Kapton tape build surface will increase the surface area, making it easier for the molten plastic to stick.
  14. EDIT:  ABS surface.  Some have suggested essentially painting the build surface with liquid ABS.2  This is has the same effect of laying down a big flat raft.
If you’ve got some suggestions, tips, or tricks that you use to fight warping and curling, please leave a comment below!